


We Share Some Why And How In Replacing Stock Handlebars
So what’s with all these baggers, tourers and all around bad-@$$ bikes with tall handlebars (AKA) “Apes”? Why would anyone want any other bar (height or width) on a bike other than the stock bar? Well, for me it’s about leverage and making the bike “fit” me better. I’m on my second Harley touring bagger (a Road Glide) and I couldn’t wait to put some 12” bars on it. After I bought a Street Glide in 2017 a family member asked me what I was going to do to make it my own. I wasn’t sure what he meant. A few months later when riding with a group of buddies I noticed one of the guys had installed 12” KST Kustom bars on his Road Glide and I had to ask, “So what’s the big deal – is this just so you can look cool or like a ‘Real’ biker?” My buddy (an engineer by trade) didn’t punch me in the nose for my wise-cracking question, but rather came back with a more technical, and I must say legitimate, response.

Let’s talk handlebar swapping.
Richard said, “Look, these Harleys are super heavy. ‘Wet’ weight can get to 900 pounds or more. Taller bars provide the rider with greater control and leverage when steering and in overall handling situations.” Later that week I started processing his comments and decided it made sense. Later that year for Christmas I bought myself a set of KST Kustoms Mayhem bars for my 2014 Street Glide Special. After a pro installation by local shop Baxters Garage I rode the bike home and immediately experienced exactly what my riding brother Richard was talking about. I felt more confident in turns, especially at lower speeds, and the bike steered somewhat lighter for me from the higher hand position.

Examining the new bars to be installed, noting where everything will go, and what minor mods we’ll need to do.
Fast forward to December 2020 – the Pandemic year that made us all stir crazy. Gathering for a charity toy ride I stumbled upon a Velocity Red Harley-Davidson Road Glide – a color that I had been Jonesing over for quite some time. Everything worked out and I was able to work a trade with our friends at Cycle World of Athens, the older Street Glide for the 2017 Road Glide. Two issues I needed to address were the stock pipes (I’m a big Rinehart fan) and those stock handlebars down in my lap had to go. I again turned to KST Kustoms and this time went with their Outlaw model. I needed a handlebar that would be more GoPro camera friendly for some of our Road Dirt work, and the “meat hook” look just wasn’t going to cut it. This time, thanks to KST, I was able to watch their installation videos which gave me the confidence to install the bars on my own.


A few pics from the process. Fairly straightforward, with some tricks we found for snaking the wires through the new bars.
The key to installation is to break down the process into three parts:
- Disassembly of the stock or current bars, instrument panel and electronics
- Wiring up the new bars with the electronics and throttle-by-wire cables
- Re-installation of the new bars, testing and re-assembly of the wires and instruments
Thankfully the tools required weren’t anything special and we were able to follow the process with minimal hassle.


Oh. Yeah. Love me some Outlaw bars.
I will say that if KST or any OEM and aftermarket handlebar manufacturer offers to provide you with any sort of tool or device to assist in the pulling of the wires through the bars – BUY IT or ASK FOR IT! Our installation video found below is only 18 minutes long. We do take some time to discuss what we eventually did to snake the wires through the new bars, but a video of that process would have been 2-3 hours long. After a few calls to some friends who have changed out their bars and more searches on the web, we did come up with our own method that worked really well. It involved some small-link chain, fishing line, and two garage staples- duct tape and WD-40.
Have a look at the video and comment below or at our YouTube channel.

Here’s our introduction and installation tutorial on how we got these on my Road Glide.
Huge thanks to the folks at KST Kustoms for the tricks and tips, for the video tutorials, and general after-the-sale customer service they provide. Thanks to senior editor Rob for recording the whole process, and offering his hands when and where needed.
Got a bar swap story? Maybe some more tips and tricks that will work for any make and model? Share them in the comments below!
Phil


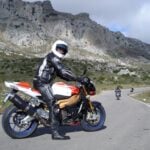

I’m more of the mind that it’s the width of the bars more than the height that gives more leverage, i.e. flat track bars. Admittedly I’m not a bagger rider (anymore) and all four of my current bikes have handlebars like the BMW in the video intro.